Range Pole Materials:
- tall pole (8 inches)
- red tape
- pencil
- grease pencil
- meter stick
Range Pole
Sighting Device Materials:
- short pole, 1 inch by 2 inches by 4 inches, pointed at one end
- orange juice can open at one end
- eye screw or cup hook
- thread
- sinker or weight
- patterns for juice can
- hammer and nails
- grease pencil
- meter stick
- masking tape
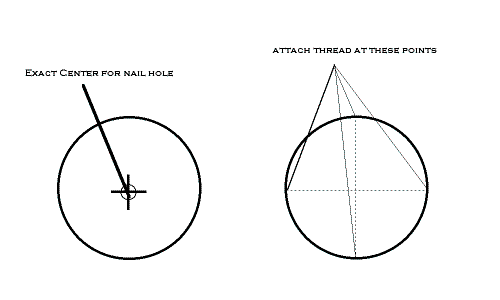
Using your meter stick as a straight edge, draw a vertical line down the middle of the same side. This line is your reference line and should be parallel to the lengthwise edges of the pole. Using a hammer and nail, start a hole right on the reference line a few inchees below the meter mark. Screw the screw eye (or cup hook) into that hole.
Attach the sinker or other weight to a thread a little less than 1 meter long and tie the other end to the hook or eye. The thread will hang down, weighted by the sinker, right along the reference line when the pole is perfectly perpendicular to the ground. The sinker will not touch the ground. This is your leveling device.
The orange juice can is used for a sighting device. Using the patterns, find the exact center of the closed end and hammer a nail partway in to make a hole. The other pattern shows where to punch small holes around the open end. Draw 2 short lengths of string through the holes and tape the ends on the outside of the can. The threads should be tight so that you can get a cross-hair pattern with the cross in the exact center of the open end.
Now tape the orange juice can in positin on the meter mark at the right angles to the pole. The distance between the center of the juice can (where the cross hairs meet) and the guidelines at the base of the pole should be exactly one meter.
Sighting Device:

Once the sighting devices are made, they will need to be finely adjusted
so the can is exactly at right angles to the pole. This can be done indoors:
- Measure from the point on the bottom of the pole to the middle of the can. This should be slightly over 1 meter since it includes the end that will be driven into the ground when you use it outside.
- Meaure and mark with a pencil the same height on the range pole. (Make it temporary, since this mark will only be used once, for adjustment.)
- Have one member of the team place the range pole against a wall, perpendicular to the floor.
- Have the second member hold the sighting pole upright a few feet away. The third member should check the plumb line so that it lines up exactly with the reference line drawn on the sighting pole.
- The second member now sights through the hole in the can to the mark on the range pole (the first member can put his/her hand on the mark on the range pole so it can be clearly seen). If the point where the threads cross lines up exactly with the mark on the range pole, the sighting device is in perfect alignment. The juice can may need slight adjusting. Once the cross hairs line up with the range pole mark securely tape the can in that position. It is now ready to use outside.
Beach Profile
Materials
For each team of three students:
- pencil
- clipboard or something to write on
- 2 meter sticks
- level (optional)
- Your team will probably work most smoothly if:
- One person is the recorder, recording on the chart the range pole reading and the elevation difference given by the sighter. S/he also checks the plumbline to make sure the sighting pole is held vertically.
- One person is the sighter, making the sightings to determine the + or - elevation differences.
- One person is the holder, holding the range pole upr ight so th esighter can make sightings.
- These duties can be rotated so each member gets a chance to do each
- Stand at the water's edge and look up the slope of the beach to the high tide mark. (The high tide line is usually clearly marked by debris.) Describe or sketch it in the space provided.
- Work will start at the water's edge. This way all groups will be on the same contour level to start with.
- Sight at right angles to the water line and send one team member up the beach to drive a stake into the ground. This stake will be the goal point toward which the team will work.
- The sighter, using the sighting pole, sightes on the goal stake and drives his/her pole into the gound up to the guidelline. Now the range pole holder stations him/herself 2 meters away from the sighter, between the sighter and the goal stake, so that the sighter can see the range pole through the sighting device.
- The recorder should check the plumb line on the sighting pole to make sure it is being held perfectly vertical. Adjust, if necessary.
- The sighter, looking through the nail hole and sighting through the cross hairs of the juice can, should instruct the range pole holder to move his/her hand up or down the pole until the hand is along the same line as the cross hairs.
- The recorder now records on the beach profile chart the range pole reading and the difference in elevation between the poles. This figure is obtained by subtracting the reading on the range pole from 100 cm. (100 cm = 1 meter = height of sighting device.) If the range pole is at a higher elevation, we get a positive (+) figure, if it is at a lower elevation, our difference is negative (-).
- The sighter moves the sight pole to exactly the same spot where the range pole is placed and drives it in. The range ple now moves 2 meters closer to the goal stake. Repeat steps 3-6 until the goal stake is reached.
- Make sure students understand that the positive (+) or negative (-) sign is crucial. "+" is for a positive or uphill slope, and "-" for a negative or downhill slope.
- Pass out materials, using same groups of three that built the equipment. Take profile measurements as directed in the student handout in some area near the school which has a measureable slope. The students will gain experience in a team measuring technique and will know what to do if you are able to visit a beach
Is the description true for the entire beach?
What is the reading on the range pole?(130 cm.)
What should be recorded on the chart for the elevation difference?
-30 cm (The result of 100 cm. minus 130 cm.)
The students should follow directions on the activity sheet and record their measurements on the chart provided. The charts should be saved for the next class.